Saturday, August 4, 2012

More Pudding, Please...

     I love pudding!  Whether chocolate, vanilla or banana, this simple fare is one of my favorite dessert categories.  And I do not consider the stuff that comes in plastic cups as pudding.  (Seriously, I challenge you to eat brown -chocolate?- and white -vanilla?- blindfolded and see if you can taste any real difference!)  My mom often made "just" pudding when she didn't want to fuss with making a pie shell for a cream pie.  It wasn't until I made banana pudding myself that I understood that the banana flavor came only from the sliced bananas!  
     For the first 20 years or so of making pudding I used the same technique as my mom which entailed cooking the milk mixture and tempering the egg (or yolks).  A decade or more ago I switched to a streamlined version that starts milk and egg out together and more recently, I've also tried to streamline the fat and calories, too.  Of course the original with more butter and egg yolks tastes the best but I am willing to compromise in order to enjoy pudding without breaking my Points Plus bank.  If you are a Jell-O pudding person, well, you've probably stopped reading already!
Vanilla pudding with summer berries.

Vanilla Pudding

Ingredients:

  • 3 tablespoons sugar
  • 1-1/2 tablespoons cornstarch
  • 1/4 teaspoon salt
  • 2 cups fat-free milk
  • 1/4 cup Egg Beaters (or an egg - add an extra PP)
  • 1 tablespoon plus 1 teaspoon butter
  • 1 teaspoon vanilla
 Putting it Together: 
     In your saucepan whisk together dry ingredients.  In a separate bowl whisk together Egg Beaters and milk (if using an egg, beat it until there are no clumps of white -those turn into bits of cooked egg white in your pudding).  Set out butter and vanilla.
I use a coated whisk to stir the pudding in my non-stick saucepan.
    Pour about a 1/4 cup of the milk-egg mixture into the combined dry ingredients and whisk out any lumps.  When smooth, whisk in the remaining mixture and place over medium-high heat.  Stir/whisk constantly until mixture thickens and bubbles which usually takes me about 10-15 minutes.  
Thickening and and ready to come to a boil.

     You can tell the pudding is getting close to done when you tilt your pan and see that the bottom looks coated - keep up the stirring!  Turn down the heat and cook for one minute after it comes to the boil - and beware of pudding explosions!   
Butter and vanilla go in once the pudding is done and off the heat.
      Add butter and vanilla, stir to combine.  Pour into dessert bowls over sliced bananas or fruit, if desired.  I chose to pour the cooked pudding into one large bowl so that I could have berries one night and bananas another.  I knew the berries would release juices and I did not want the pudding to get watery.  To keep a pudding "skin" from forming press plastic wrap directly onto the pudding's surface.  

Plastic wrap pressed on the surface right after cooking prevents pudding "skin" from forming.


     Weight Watcher's Recipe Builder estimated a total of 15 Plus Points for the entire recipe.  Divided into 5 approximately 1/2 cup servings would  give each serving a PP value of 3; divided into 7 approximately 1/3 cups servings (which was plenty over the berries) would be a value of 2 PP each.  If you are not concerned with counting Points I would recommend not using fat free milk, I would use a whole egg or two yolks and double the butter.  But for me this recipe is a compromise I can live with and enjoy.
Banana pudding, a family favorite.


Thursday, August 2, 2012

Chicken Little, Asian Style

     No, the sky is not falling, I'm just referring to the low Points Plus cost of chicken, especially boneless skinless chicken breasts.  Chicken breasts can be low on the flavor scale but that is also what makes them so versatile - their ability to take on so many flavor profiles.  This chicken's profile is Asian (perhaps more American-Asian),  simple teriyaki marinated grilled chicken strips served with teriyaki-marinated grilled vegetables over jasmine rice.  
     This old favorite that was inspired by the delicious teriyaki take-out we enjoyed while living in the Seattle area over 20 years ago.  Recently I lightened the marinade up a bit by cutting back on the soy and sugar, upping the ginger and adding a touch of heat - and it tastes even better.  Now, if you've ever tried bottled teriyaki sauce/marinade, once you make this simple recipe you will find that stuff a pale and poor substitute!  I hope you take this challenge and give this recipe a try and please let me know what you think.
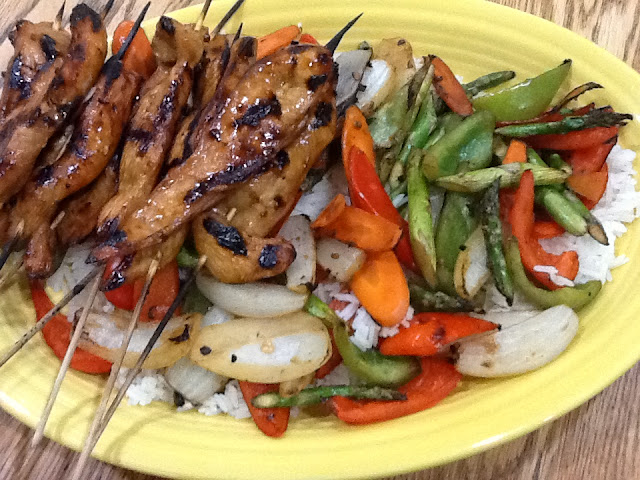
Teriyaki chicken skewers and grilled veggies over jasmine rice.

Teriyaki Marinade

Ingredients:

  • 1/4 cup apple cider vinegar
  • 1/2 cup soy sauce (I used lower sodium)
  • 1/4 cup brown sugar
  • 2 tablespoons of sherry (I use Dry Sack because it's what I have in my frig.  A decent bottle of Spanish sherry - do not buy American! - is usually around $10.  A common one that is good for this recipe is an amontillado.  Sherry keeps well and I use it in stir-fry recipes, trifle, tiramisu - and you can drink it, of course!  It is often drunk before dinner to stimulate the appetite.)
  • 3-4 cloves garlic, pressed through a garlic press
  • 1-2 inches peeled fresh ginger, finely minced (about 2-3 tablespoons)
  • 1/2 teaspoon sriracha sauce

Putting It Together:

     Combine all ingredients in a non-reactive container and stir until sugar is dissolved.  The sherry is key to this recipe and I cannot think of a possible substitute.  If you use fresh ginger infrequently keep it in the freezer in a Ziplock bag.  When you need some just peel a bit, then grate or slice off coins while still frozen and pop it back in the freezer.  The recipe makes about 1-1/4 cups of marinade, enough for 2-4 boneless chicken breasts.  Since I usually use only two breasts, I pour off about 1/3-1/2 cup into a second bowl and reserve it in the frig for marinated grilled vegetables.
     For best tasting results I do not recommend using whole (boneless or bone-in) breasts.  I've found that thinner strips rather than chunks of chicken make for a more intense flavor since the marinade doesn't penetrate the interior of the meat.  I cut each breast in half then halve each half.  The chicken is best when marinated overnight (24 hours) in the frig.  Skewer the meat before grilling.
Time to push the chicken into it's tasty bath.
     Make certain to dunk and move the chicken around to immerse it in the marinade.  The next morning flip the pieces over, dunk and immerse again.  You'll see that the bottom sides (which are now the top) have darkened.  If you plan on marinating and grilling vegetables cut them into large pieces, place them in a Ziplock bag or tightly fitting plastic container.  With this marinade I like bell peppers, sweet onion or green onion, asparagus, thinly sliced carrot, green beans and/or broccoli.
A rainbow of veggies for grilling.


     Whatever vegetables you choose think about cooking time as you cut them.  The carrots are cut very thinly since they are the hardest veggie.  The peppers, asparagus and onion are approximately the same size as they'll cook at about the same rate.  Broccoli florets cook faster than stem pieces so it would be a good idea to make the florets a bit bigger and cut the stems like the carrots.  No, you can't see the broccoli - I went with asparagus this time (that big Costco bag!) but broccoli is so yummy with in this marinade. 
Flip the sealed container back and forth occasionally to redistribute the marinade.
     Pour the reserved marinade over the vegetables, seal the container (or bag, if you trust them) and flip back and forth several times to mix up the veg and disperse the marinade.  Do this a few times during the day.  Marinate in the frig for 5-6 hours.  
Soak wooden skewers for 30 minutes prior to grilling.
      About 30 minutes before you're ready to grill soak the wooden skewers in water.  I'm not a fan of metal skewers.  As the skewers get hot from the grill heat the meat can loosen around the skewer (even more true for veggies) and slide around or off, plus the skewers are just too large to place in the "right" hot or cool place on my grill.  I've always heard that soaking the skewers for 30 minutes stops them from burning.  It would be more accurate to say stop them from burning more as they do burn.  My main reason for soaking them is that the chicken releases better from the wood once cooked.  Thread the marinated chicken strips on the soaked skewers and place on a wire rack for a few minutes before grilling.  Make certain to oil or spray the chicken and the grill before cooking. 
Ready to spritz with cooking spray.
     If you do not have a grill basket you have a couple options that have worked for me in the past.  If the vegetables are cut in large enough pieces, they may be placed directly on the grill grate; you have more control but it's a fussy and hot job.  Skewering the vegetables after marinating works well, too.  Keep in mind that harder vegetables such as carrots may not cook as well when cut into large pieces without blanching or par-cooking them first.  A grilling screen can be inexpensive and is placed directly atop your grill grates.  But a grill basket is my favorite method and I have been through several different types.  My current stainless steel one from William Sonoma is my favorite.  At the end of the summer Bed Bath and Beyond and many other stores put them on sale or clearance. 
Grilled vegetables are so delicious!
     Whatever your method make certain to spray or oil the grill grates, grill basket or screen.  If the chicken is sliced thinly it will finish cooking before the veg.  No problem, just let it rest off the heat while the veggies finish.  Of the veg I used, the onion took the most time.  Broccoli would have taken the least.  Shift the finished veg to the coolest spot and the more raw to the hotter.  
     The veggies can also be sauteed inside.  Instead of marinating the veg, just add the marinade towards the end of cooking time.  If you stir a teaspoon or two of cornstarch into the cold marinade before adding it to the pan you will have veggies in a sauce.  
     The marinade can cause the chicken to stick a bit even on an oiled grill.  If you use a grill spatula and scrape under the chicken when it is time to flip them you lessen the chances of leaving the pretty outside on the grate!
This yummy chicken-on-a-stick would also make great appetizers.


     These thin strips of chicken cook quickly, just 5-7 minutes on the grill at a temperature between 350-400.  This marinade is also great with boneless pork and beef.
     The entire marinade recipe totaled a value of 9 Points Plus on Weight Watcher's recipe Builder.  After measuring before and after amounts of marinade I am comfortable adding an extra PP to my chicken and an extra PP to my veggies.  What type and amount of vegetables and protein you use will determine your PP value but I think you could enjoy a delicious meal of chicken, veggies and rice for around 10-12 PPs.  

Tuesday, July 31, 2012

One Potato, New Potato...

     My husband loves sweet potatoes but I just don't care for them, especially their thready, fiber-y texture.  He suggests them frequently...very frequently.  He also loves squash which I disliked until I tried spaghetti squash (after much coaxing from my dear husband).  So since the squash worked out so well I decided to give sweet potatoes a try - but with great reservation.  
     At a past (long past - takes me a while to try new things) Weight Watcher meeting another member had mentioned sweet potato chips (and I had loved those fried sweet potato chips at a Mexican restaurant) so I decided to give them a shot.  Well, several shots, as it turned out.  The first few times I used my cheese slicer to cut the thin slices, my go-to-technique for thin potato and cucumber rounds.  I soon discovered that sweet potatoes are much harder - literally!  The baking temperature and time is tricky - one minute they look beautiful then next minute they're burned.  But one thing I did learn from that very first try is that they taste great!  To me they are much better tasting than store-bought baked dried potato chips plus they have the added nutritional bonus of beta-carotene and vitamin A.  They had me at better tasting...
Sweet potato chips, seriously addicting!

Baked Sweet Potato Chips  

Ingredients: 

  • Sweet potatoes, scrubbed (I used 2 medium, about 13 raw ounces)
  • Cooking spray
  • 2 teaspoons olive oil (optional)
  • A large, heavy baking sheet
  • A large wire cooling rack
  • Salt and pepper
 Putting It Together:
     Scrub the sweet potatoes well but do not peel.  Using a knife or mandoline type slicer, cut the sweet potatoes into thin slices; not paper thin but about a sixteenth of an inch thick.  I had a very crowded baking sheet with two average sweet potatoes; for more chips use two racks and sheets.
Such a time saver!
     Preheat the oven to 400 degrees F.  Dump the slices into a large bowl, drizzle them with 2 teaspoons of olive oil (or spray them with olive oil cooking spray) and sprinkle on 1/4 teaspoon salt and a couple grinds of black pepper.  Toss with your fingers to distribute spices.  Sprinkle on another 1/4 teaspoon salt and toss again.
Using a wire rack is key to baking the chips.
     Lay the slices in a single layer (trying to minimize overlapping as much as possible) on a wire rack (1 large or two small placed side by side) placed atop a large, heavy baking sheet.  Spritz with olive oil cooking spray.  Sprinkle on additional salt if needed.  The wire rack makes a huge difference in baking and in the final product - I wish I had thought of it a few tries back!  On the rack the chips don't stick, there's no need to attempt turning them over, they cook more evenly and the clean up is much easier, too.  After putting in the sheet(s) turn down the oven to 350 degrees F.  Bake for 10-18 minutes, rotating pan halfway through.  After 10 minutes of cooking time, check them every few minutes - they brown very quickly after a certain point.  Remove from oven when crisped to your satisfaction.  The darker brown ones may not look as pretty but they still taste great.  
Lots of shrinkage!  13 ounces of raw potato became approximately 3-1/2 ounces of baked chips.

     A total of 13 ounces of raw sweet potato with 2 ounces of olive oil was valued at 9 Points Plus on Weight Watcher's Recipe Builder.  Using only cooking spray with the 13 ounces made the total go down to 7 PP.  Dividing the recipe into 3 one-ounce (a bit more, actually) servings would make each serving either 2 or 3 PP.  For someone who didn't like sweet potatoes of any kind, I now find them addicting and delicious!
Sweet potato chips make burger night even better.


Sunday, July 22, 2012

Steak, Potatoes and a Green Salad - the Saturday Night Special...

     I have not been on my kale kick for very long and a kale salad was my very first post.  I was so excited about finding a new-to-me vegetable, one I could see just by looking at it's beautiful dark green leaves that it was going to be good for me (AKA a "healthy" choice).  That excitement and the desire to share my "discovery" with other Weight Watchers is what started my little blog.  When I eat a kale salad I feel a sense of well-being (no kidding!) and I picture little green Pac Man nutrients racing through my body - crazy, I know!  And since I have to work at chewing a kale salad that makes me feel that I am eating a real vegetable, not just "salad."
     This time around I wanted to use vegetables in the kale salad and no fruit, something that was hearty and substantial with the sirloin I was going to grill.  I choose red peppers (bought that bag of 6 at Costco!), carrot, cucumber and onion, things I would typically use in a "regular" green salad.  Steak (a lean, marinated piece of sirloin), salad (hearty kale and veggies in a no-oil dressing), and potatoes (skin-on oven fries) - a classic combination for a Saturday summer night's dinner!      
The Saturday Night Special: steak, potatoes and a green salad.

Kale-Veggie Salad

Ingredients:  

  • Bunch of kale (Lacinato or curly), rinsed with ribs removed
  • A carrot
  • A cucumber
  • A red sweet pepper
  • Half a small sweet onion
  • 1/4 cup red wine vinegar
  • 2 tablespoons water
  • 1-1/2 teaspoons salt
  • 1/4-1/2 teaspoon black pepper
  • 1 tablespoon plus 1 teaspoon sugar

Putting It Together:

     In a small bowl, stir together red wine vinegar, 1 tablespoon sugar, 2 tablespoons water and 1 teaspoon salt until sugar/salt dissolve.  Cut onion half into large 1/2-1inch sized pieces and add to vinegar mixture; set aside.   
Onion pieces are mellowing in the vinegar/dressing mixture.
    While the onions mellow out, prepare the rest of the vegetables.  Rinse the kale leaves and pull out the ribs.  Stack up the leaves and cut into thins strips; place in a large serving bowl.  
Those ribs are tough and woody and I can't imagine even eating them cooked!
     Pour the vinegar mixture over the cut kale, holding back the onion pieces; toss the cut kale, sprinkle over a teaspoon of sugar and 1/2 teaspoon salt; set aside.  Cut the carrot, cucumber and pepper and add to the reserved onion pieces.  Sprinkle with freshly ground black pepper and a pinch of salt, toss together vegetables.
A rainbow such as this just has to be good for you!
     Add the vegetables to the kale-vinegar mixture and toss well to combine.  Cover and refrigerate several hours before serving; this resting time is necessary to soften the kale and remove some of its bitterness.  Pull out the salad once or twice to toss and redistribute the dressing.   

A hearty salad with a tangy vinegar sweet-sour bite.
     Weight Watcher's Recipe Builder came up with a total of 9 Points Plus for this kale salad recipe.  All the salad ingredients are "free" so why the Points?  Think serving size - a Weight Watcher vegetable serving is one half cup and "free" foods are to be eaten in moderation.  The volume of the kale does deflate as it marinates but I would estimate the recipe easily makes 9-1/2 cup servings and that gives each serving a value of 1 Point Plus.  I choose to count my serving(s) as "free" and you, dear eater, may chose for yourself.
     I usually give myself a noon deadline on preparing this salad so I know it has several hours to mellow before dinner.  The steak prep is dependent upon the cut of steak I am using.  I prefer to give a flank steak or London broil the whole afternoon (or morning and afternoon) but the boneless top sirloin I used in this post was not a tough cut of meat in comparison, so I was shooting for 4-5 hours of marination time.      
     The flavor of this simple marinade is all-American beef-on-the-grill yummy.  It's common pantry-frig ingredients just bring out the best in beef flavor and is a snap to put together.  Before I was "gifted" with a Cuisinart, I just chopped and mixed by hand so don't let the lack of a food processor stop you - it just makes prep faster.

Simply Steak Marinade

Ingredients:

  • 1/4 cup vinegar (red wine or apple cider are my favorites)
  • 1 teaspoon salt
  • 1 teaspoon crushed dried oregano
  • 1/4 teaspoon freshly ground pepper
  • 2 teaspoons brown sugar
  • 2 tablespoons Worcestershire sauce
  • 1/2 medium sweet onion, rough chopped
  • 3 cloves garlic, smashed
  • 1/4 cup ketchup
  • Small handful of flat leaf parsley leaves

Putting It Together:

     Into the bowl of a food processor, add first 8 ingredients and pulse until blended but left with some texture.  If preparing by hand, finely chop onion and garlic, roughly chop parley and combine with the remaining ingredients in marinating container.
Marinades enhance the flavor of and tenderize leaner cuts of beef, a win-win for WWs!
     After pulsing to combine, add the ketchup and flat leaf (Italian) parsley.  Pulse a few times to combine.  I've found the onion and garlic chop better without the thick ketchup in the first go-around but you may not have that issue.  The parley is added last so that it isn't obliterated.
Just a couple of pulses and it's ready to fulfill it's flavor destiny!
     Trim your steak of fat and any "silver skin".  I find it so much easier to see and remove the extraneous fat before the meat is cooked and I appreciate knocking off a Point or two on my serving(s) by trimming.  If you are not concerned about fat, well, you're a fortunate so-and-so!  Pour the marinade over the steak in a non-reactive container, turn over, making certain to surround the meat.  Cover and refrigerate for 4 or more hours, depending on the cut of the meat.  
Turn the meat over and dunk it around to cover it completely with the marinade.
     Remove the meat from the marinade 20-30 minutes before putting it on the grill.  The meat will warm up a bit before it hits the smokin' hot grill (less stickage) and have a chance to dry off a bit (also helps with browning and stickage).  I like to put meat to be grilled on a wire rack and scrape off the marinade - you can also pat it with a paper towel.
I trimmed off slabs of fat and ended up with 2 pieces...but also less Points.
     Before grilling, spray both sides with cooking spray and add a sprinkle of salt to each side.  Always oil your grill grates, too.  Cooking time depends on the size of the steak and the rareness preference.  But always let your meat rest before slicing or eating (whatever type, from burgers to chicken) or you'll see the juices on your plate and not in your food and you'll be left eating a dry piece of steak, chicken, pork or burger, wondering what you did wrong.  This is a lesson that has made me a much better griller.
Beef!  It's what's for dinner.
     The last component of the Saturday Night Special are the potatoes, oven fries in this case.  The earlier prepping of the salad and steak make the prep time for the fries seem like, well, small potatoes.  I usually start the potatoes when I take the marinated steak out of the frig.  While it's coming to room temp there's time to prep the fries, the grill, etc.
The recipe's technique is from Middle-Eastern Style Potatoes (in an earlier post), just with bigger potatoes!  In the past, whenever I made oven fries they would either be soft but not have much color, so I'd leave them in longer or use a hotter oven, and then they would brown but be dry inside.  So if the brown-steam-oven technique works for cubed I was hoping it would work for fries - and it did, beautifully.

Oven Fries

Ingredients:

  • Scrubbed potatoes (my 2 russets equaled 20 ounces raw)
  • 2 teaspoons olive oil
  • Salt and pepper
  • Seasoning mix: 1/4 teaspoon each onion and garlic powder, paprika, salt and pepper plus a dash of cayenne
  • Olive oil cooking spray

Putting It Together:  

     Scrub and cut potatoes into fries (too thin and they'll be too fragile to manipulate without breaking); pat dry.  Heat oil in a non-stick skillet that has a tightly fitting lid.  Add potatoes, sprinkle with 1/2 teaspoon salt and let brown over medium-high heat for 4-5 minutes.  Turn over fries and let them brown on other sides for 4-5 more minutes.
I found some beautiful new bakers with thin, flaky skins - so delicious!
     Preheat the oven to 400 degrees.  Spray a heavy baking sheet with cooking spray and set aside.  After the potatoes have browned for the total 8-10 minutes, add a couple tablespoons of water to the pan and quickly cover.  Turn the heat down to low and let the fries steam for about 4-5 minutes.  Remove lid, let any remaining water evaporate, season with salt and pepper or a mix of seasoning for more zip.  Turn fries gently to coat and carefully pour onto prepared baking sheet.  
     If you need more time to pull your meal together, bake the potatoes at 375 for 20 or more minutes, checking on them to make certain they don't over-brown or dry out.  If you need less time, opt for 400 degrees for 10-15 minutes.  Just don't forget to monitor their progress.  I often start out at 400 and turn the oven down when I put them in.  My convection does a great job but does cook faster.  I don't turn the fries - I'd rather not risk breaking them!   
Just a few more minutes to perfection!
     As a diner and Weight Watcher I love this recipe for it's flavor and low Points Plus value. As a cook I love this recipe for it's ease of preparation and it's downtime that allows me time out at the grill - what a winning combination.  Weight Watchers Recipe Builder's total came out as 13 points Plus (using 20 ounces of raw potato).  This came out to be five servings of approximately 3 ounces each, 3 Plus Points per serving. 
The Saturday - or any day - Night Special!
     This hearty meal was very satisfying and not a Points budget buster.  Three ounces of trimmed, cooked sirloin weighs in at 3 Points (untrimmed would have been 5 Points Plus!) and I'm not spending any Points for the marinade (see my Chipotle Pork Post!).  The salad is a Point per serving (for some of us) and the oven fries are 3 Plus Points per serving.  I had 5 ounces of steak (5 PP), a cup of salad (2 PP - really?), and 6 ounces of fries (6 PP) for a total of 13 Plus Points (or 11 PP without counting the salad).  A less ravenous person eating a single serving of each would have used only 7 Plus Points.  Regardless of Point values, this is a dinner full of flavor that anyone would enjoy, any day of the week!          


Saturday, July 14, 2012

More Green for Me: Kale Ginger-Berry Salad

     If you've read one of my earliest posts, "A New Dark Leafy Green for Me...", you already know of my new love of kale, especially when paired with fruit and citrus.  I just never tire of that orange-apple-cumin kale slaw.  The change of season has also changed the availability of some key ingredients for my beloved kale slaw.  Oranges are not a summer fruit and those available are not very tasty.  The same can be said for the apples - just pretty ho hum until the new fall crop comes in.  It was time to try something new.  
     The citrus is an important element since the acidic juice helps to soften the somewhat tough kale leaves.  I chose to substitute a lemon for the orange since I usually have some in the frig (they're so versatile) and used strawberries for the apple, since I had those on hand, too.  Those two flavors are great together - I usually add lemon zest to a simple yellow cake recipe when I make strawberry shortcake.  Last weekend I passed on the cake part and served fresh strawberries that had been macerated in lemon juice, lemon zest and Splenda and they were scrumptious!  
     I now needed to find a flavor that added a punch like the cumin did in the original version - cumin was just too earthy for the summery marriage of lemon and strawberry.  Then, on my kitchen counter, I saw the container of candied fresh ginger I had bought for cookie-making and there was my answer!  This new version which I call Kale Ginger-Berry Salad is beautiful to look at, has a slightly sweet citrus tang, juicy bites of summer strawberry and a heat/warmth from the fresh grated and the candied gingers.  It's perfect for summer and I hope you'll try it for yourself!
Another dark leafy green for me, Kale Ginger-Berry Salad.
Kale Ginger-Berry Salad
Ingredients:
  • Fresh strawberries, rinsed and halved
  • A bunch of kale; rinsed, de-ribbed and cut into thin strips
  • A lemon, zested and juiced (about 1 teaspoon of zest and 2-3 tablespoons of juice)
  • 1/2 teaspoon fresh grated ginger or ground ginger
  • 1 tablespoon honey
  • 1 teaspoon Dijon mustard
  • 1/4 teaspoon ground coriander
  • Salt and freshly ground black pepper
  • Half an ounce of candied fresh ginger, chopped finely
Keep ginger root in your freezer, peel then grate frozen, as needed.

Look for candied fresh ginger in your store's produce, baking or bulk foods sections.

Putting It Together:

     Rinse the individual leaves of kale; fold each leaf over onto itself (like a Valentine), grip the two sides and rip away from the woody spine and set aside.  Stack the de-ribbed pieces on a cutting board and cut into thin strips; place in a large serving bowl (I estimated 5 cups of cut, packed kale).  Sprinkle over 1/4 teaspoon salt, the fresh lemon zest and half of the freshly squeezed lemon juice.  Using your hands, toss and massage the kale strips and set aside.
Time to massage in the salt and lemon.
     Rinse and de-hull the strawberries; halve or thickly slice the berries and set aside.  I had about 1-1/2 cups of halved/sliced berries.  In a small bowl combine the remaining half of the lemon juice, grated fresh ginger, coriander, Dijon mustard, pinch of salt, a few grinds of pepper and the honey; whisk to combine.  Add the sliced strawberries and chopped candied fresh ginger to the massaged kale, pour over dressing and gently toss to combine.  Check and correct the flavor if necessary - may need more sweet or sour or heat.  Refrigerate salad for a minimum of three hours to allow kale to continue to soften, flavors to mellow, strawberries to macerate. 
The candied ginger really adds some zing to this salad.  The kale is already beginning to darken and soften.
     Weight Watcher's Recipe Builder totaled 10 Points Plus for this recipe when made as described above.  That would make each of 5 servings 2 Points Plus.  The fresh grated and candied ginger do add a punch of heat which I love, but if you are new to using ginger I suggest starting with less, tasting and adding more if needed.      
My husband and I agree, the Kale Ginger-Berry salad is our new favorite!


Cold Summer Supper: Tuna Pasta Salad

     It has been a very rainy July so far and I really needed a break from grilling in the rain!  I decided to make an old favorite, a cold tuna pasta salad.  In the past I cooked about 6 ounces of pasta for the salad and baked fresh-fruit muffins for extra carbohydrates for my husband, but this summer I needed to cut out some of those carbs.  
     Again, my husband gave me his target range which I combined with my Points Plus value range and came up with 3 ounces of uncooked pasta shells (which with my brand was 63 total carbohydrates).  That is not much pasta so I needed to bulk the dish up with more vegetables than my usual celery, onion, sweet pickle and a bit of bell pepper.  If a little bell pepper is good, more should be even better - and it was!  
     The shots of colorful veggies throughout the dish are visually appealing and the crunch is very satisfying - a winning combination.  Some delicious fresh fruit replaced the muffins and added a sweet and juicy compliment.  We Weight Watchers are able to enjoy fresh fruit for "free" but fresh fruit comes with a low price tag for everyone; an ounce of fresh melon, watermelon, pineapple or strawberries is only 2 carbs - so indulge and enjoy summer's colorful bounty!
Crisp vegetables, tender pasta shells and canned tuna in a tangy dressing.

Tuna Pasta Salad

Ingredients:

  • 3 ounces uncooked medium shell pasta (cook until al dente and hold in ice water)
  • A 12-ounce can of chunk-style water packed tuna, well drained
  • 6 tablespoons Light Miracle Whip (my preference)
  • 1 generous teaspoon Sriracha
  • Bread and Butter Pickle Chips, chopped (6 chips)
  • A small red onion, sliced into thin crescents
  • Half a red pepper, sliced into thin crescents
  • Half a green pepper, sliced into thin crescents
  • Half an orange or yellow pepper, sliced into thin crescents
  • 2 ribs of celery, cut on the diagonal into thin slices
For eye-appeal cut your raw veggies into approximately the same size and shape, whether sliced or diced.

Putting It Together:

     Put your pasta water on (a covered pot heats faster than uncovered) - don't forget to salt it.  Measure out your pasta and have it at hand.  F.Y.I: This recipe could easily handle twice as much pasta.  Do not overcook the pasta since it softens a bit as it mellows in the frig - overcooked pasta will get even mealier in the refrigerator!  Rinse the cooked pasta and hold it in a bowl or pot of ice water until you're ready to assemble the salad.   
     Rinse, trim and cut your vegetables in a similar size and shape for better eye appeal; place in a large serving bowl.  After all, it is said that we eat with our eyes first.  I've found that raw onion can be a bit too harsh (even red Vidalia), so to mellow the flavor, place the cut raw pieces in a bowl of ice water for a few minutes.  Just drain the onion pieces onto a paper towel before adding them to the other veg.  
A healthy balance of ingredients, all ready to combine. 
     Cut and add the pickle chips (I love the sweet-sour tang with the heat from the sriracha), the well-drained pasta, the drained tuna (averages about 8 ounces after drained), the light Miracle Whip (or your choice of mayo, yogurt, etc.), sriracha and a little salt and black pepper to the bowl.  Stir gently to combine, check your seasoning and heat, adjust if necessary.  I like to spoon the pasta salad onto old-school crispy iceberg lettuce - reminds me of tuna salad sandwiches!    
A summer's bounty of Power Foods!
     Weight Watcher's Recipe Builder estimated a value of 21 Plus Points for the entire recipe (made as written above).  The recipe made 5 cups of pasta salad, each 1-cup serving equaling 4 Plus Points.  With the lettuce base and side of fresh fruit with this Pasta Tuna Salad, there's no worry about fulfilling daily fruit/veggie Power Food guidelines!      


Friday, July 13, 2012

Still Crazy for Cumin: Moorish-Style Pork

     A couple summers ago my sister shared a recipe with me, Pork in the Style of the Moors, and this dish soon became a favorite.  I do not know her source of the recipe but it's provenance is southern Spain, a mixture of Moorish spices and Christian pork.  It is quick and easy to put together and is loaded with one of my favorite spices - cumin!  
     This summer I realized I hadn't been making Pork in the Style of the Moors (seriously, that's how my husband and I refer to it - what a mouthful!) as frequently and wondered why it had fallen out of favor.  Flavor was the answer, I realized.  I had been making 2 pork tenderloins at a time and switched to using a single one and the spices were now too heavy tasting.  I altered the recipe, halving some of the spices and cutting back on the marinating time, and this Moorish-Style Pork is back in the summer grilling rotation!  
     I have also taken some other liberties with this recipe - firstly, shortening the name!  Secondly, the original recipe called for toasting then grinding whole cumin seeds which I did the first time (and no disrespect to serious cooks) but this just didn't make a huge flavor difference to me.  I use a very dark and earthy cumin (and more pricey) and I go through it quickly.  I also skipped the saffron called for in the recipe but what you don't know you will not miss!  
     Lastly (I think...), I did not cut the pork tenderloin into small cubes and skewer the meat.  Well, I did that technique the first several times but realized the timing on the grill was too short and fussy for me (and I hate overdone pork) so I chose to cut the tenderloin into large chunks (5 or 6) before marinating.  Without the skewers I'm also able to move the largest chunks to the hot spots or move the thinner "tail" to a cooler spot which makes for more even cooking results.  For pork cooking guidelines please check out my Chipotle Pork post.  Middle Eastern-Style Potatoes or Cauli-Couscous are great carb sides with this pork entree and the Pepper Salad is a perfect veggie side, I think.

Moorish-Style Pork

Ingredients:

  • 2 teaspoons olive oil
  • 2 teaspoons ground cumin
  • 1 & 1/2 teaspoons sweet paprika
  • 1/4 to 1/2 teaspoon hot paprika  
  • 1 teaspoon crushed dried oregano
  • 1/2 teaspoon salt
  • 1/4 teaspoon ground black pepper
  • 1 tablespoon pressed or minced garlic cloves, about 4-6 cloves
  • 1 tablespoon chopped Italian (flat leaf) parsley
  • 2 tablespoons fresh lemon juice
  • A pork tenderloin trimmed of fat and silver skin, cut into 4-6 large chunks
Oil, garlic, lemon juice and pressed garlic are added to the combined dried spices.

Putting It Together:

     Mix together dried spices in a non-reactive bowl.  Add olive oil, pressed garlic cloves, fresh lemon juice and chopped parley and stir together well.  Dump in the pieces of pork tenderloin and using your hands, rub the mixture into and all around the meat.  Cover the bowl and let rest in the refrigerator a minimum of three hours or overnight.   
Cover and let meat marinate for three hours to overnight in the refrigerator.
     Half an hour before grilling time, remove the meat from the refrigerator.  Cold meat and a hot grill can lead to some serious sticking!  I like to lay marinated meat on a cooling rack so that I can push off the extra marinade and/or pieces of the marinade that may burn and add a bitter flavor to the meat.  Then spritz both sides with olive oil cooking spray and using a very light hand, sprinkle with salt and pepper and it's ready for the grill.
Push off extra marinade, spritz with cooking spray, a very light touch of salt & pepper and it's grill time!
    Trimmed pork tenderloin is a Weight Watcher friendly protein choice.  A 2-ounce serving of trimmed and cooked tenderloin is 2 Points, a 3-ounce serving is 3 Points.  The above marinade adds negligible extra Points if the pound of pork is divided into 4 or more servings. 
Moorish-Style Pork, Cauli-Couscous and grilled peppers and onion.