Wednesday, April 25, 2012

Eating Out at Home...


     One of my favorite dishes and the only thing I've ever ordered  at Carrabba's is the Pasta Carrabba.  It is made up of a huge serving of their wonderful house-made fettucini with alfredo sauce, English peas and sauteed mushrooms along with a woodfire-grilled chicken breast.  Even though I give my husband half of the pasta, get the sauce on the side and use just a few spoonfuls, and ask for the chicken "dry", it still tastes great.  So great that I tried replicating it at home and eventually was happy with my end result...happy many, many times.  
     But I felt that it needed a nutritional bump up so I decided to substitute steamed broccoli for the peas and mushrooms - and the result is my new favorite.  Sauteed asparagus and red peppers are also wonderful and preceded the broccoli phase.  I serve the alfredo sauce and vegetables over store-bought fresh pasta along with a grilled chicken breast or piece of beef and I must admit that I like it better than my inspiration...except for the pasta.   
     Be forewarned that this is a small recipe for 3 servings and that they do not look like generous servings - but the few tablespoons I eat pack more flavor and satisfaction than the huge bowl of sauce that accompanied my Pasta Carrabba.  I hope you'll think so, too.
Alfredo sauce over steamed broccoli and pasta with grilled chicken breast.

Alfredo Sauce

Ingredients:

  • A medium shallot, minced very finely
  • A teaspoon of olive oil
  •  A teaspoon of butter
  • 1/8 teaspoon crushed red pepper flakes
  • 1/4 teaspoon salt
  • 2-3 cloves whole garlic, peeled and slightly smashed (you'll need to be able to pick them out)
  • 4 teaspoons flour
  • 1 cup fat-free milk
  • 1/8 cup half and half
  • 3/4 ounce finely grated Parmesan cheese (I use parmigiano reggiano)
Waiting until ready for the cheese.

  Putting it together:

     Heat the oil/butter and add shallot; sprinkle on salt and crushed red, toss in garlic cloves and saute over medium-low heat until softened.  Sprinkle flour over mixture, stirring for a minute or two to cook out the raw taste of the flour.  Slowly pour in combined milk/half and half, stirring constantly.  Mixture will thicken slightly but take care not to overheat.  At this point I often just turn off the heat to go grill my chicken, finish chopping veg, etc.  
I love these bags!
When I am ready for the sauce I turn the heat back to medium-low, remove the garlic cloves, stir and add a tablespoon or 2 or 3 of pasta water (or hot tap water) 
and stir in the 3/4 ounce grated cheese; taste and add salt if needed.  Use a rubber spatula to scrape every yummy bit over vegetables and/or pasta.
      Recipe Builder estimates 10 points for this sauce recipe (about 1 cup total), 3 Points for each of 3 servings.  
     My 5 oz. grilled chicken breast (4 Points), the cup of fresh pasta (5 Points), my steamed broccoli (0 Points) and my serving of alfredo  (3 Points) totaled 12 Points.  This 12 Point meal was carb heavy and I may cut down or cut out the pasta next time but I enjoyed it - almost as much as I enjoyed feeling no guilt!


A Switch-Up Update...

Grilled chicken breast over sauteed asparagus and red peppers with pasta and alfredo sauce.
     My husband has been pestering me for asparagus and red pepper with the skinny alfredo sauce for months so I took pity on him.  It had been months since we'd last had this combination and it was a very nice change.  I simply sauteed the veggies inside but grilled (my husband's idea - next time...) veggies would be good, too.  What combinations sound good to you?

Tuesday, April 24, 2012

Chicken Little...

     Boneless skinless chicken breasts are a Weight Watcher staple which I usually enjoy grilled.  After much prompting from my husband (answering, "How about chicken parm?" whenever I asked for his dinner input) I decided to try to improve my oven "fried" chicken breasts.  The simple recipe for crispy chicken breasts I came up with would never be mistaken for fried chicken breasts but are (at least to my mind) delicious and moist and a great accompaniment to pasta (or spaghetti squash) and marinara or with my Easy Ratatouille.  The following recipe is for two breasts so just double or triple the crumb recipe as needed.

Crispy Baked Chicken Breasts

Crumb Coating Recipe: 

  • 1/4 cup Ian's Panko Breadcrumbs (or any Panko equaling 2 Points per 1/4 cup)
  • 1/3 ounce finely grated Parmesan cheese (I use Parmigiano Reggiano)
  • 1/4 teaspoon dried oregano (rubbed and crushed between your palms)
  • 1/4 teaspoon dried basil (rubbed and crushed between your palms) 
  • 1/4 teaspoon salt
  • 1/4 teaspoon pepper
  • 1/4 teaspoon garlic salt

In Addition:

  • 2 skinless boneless chicken breasts (about 5 ounces each)
  • 1 tablespoon light butter, melted
  • 1/4 cup part skim mozzarella (to equal 2 Points) 
  • Cooking Spray
  • A meat mallet
Breast on right is flattened.

Putting it Together:

     Preheat oven to 400 F; convection is fine.  Combine the crumb ingredients in a large, flat-bottomed bowl or pie pan; set aside.  Trim any visible fat from breasts and place a long piece of plastic wrap on a flat, washable cutting board.  Place the breasts, side by side (leaving ample space between them) on top and fold over the plastic wrap to cover them.  Using the flat end of a meat mallet gently pound the breasts on the thickest parts until they seem nearly a uniform thickness.    
Don't forget to season the chicken!
     Brush the breasts with the melted light butter, sprinkle lightly with salt and pepper and press buttered side onto crumb mixture, one breast at a time.  Place crumb side down and repeat process on remaining sides.

     Place on a baking sheet (with low sides) which has been sprayed with cooking spray, spritz the breasts lightly with the spray (I use olive oil cooking spray) and bake in a preheated 400 F oven for approximately 10-15 minutes; sprinkle with the mozzarella 3-4 minutes before done.    


   Recipe Builder has estimated 15 Points for the 2 chicken breasts (10 ounces raw chicken, total), making for a total of 7 Points per serving.  In the above photo I served the chicken with a quick vegetable sautee and Barilla marinara sauce over spaghetti squash for 4 additional Points.  It was a delicious and filling meal costing me 11 Points.

Poppin Fresh...


Lemon Pepper Popover
     I was trying to come up with a carb/starch to have with my Sole-Wrapped Asparagus Bundles recently and realized that I hadn't made popovers for months.  When it comes to muffins or other quick breads I often end up with a less appealing version after my Point-lowering changes but not so with popovers - I get the unadulterated real deal for 3 points per popover!  For those of you not familiar with these yummy poufs (crispy and light balloons with an egg batter interior), popovers have few ingredients, including not too much fat and no sugar - so they are an indulgence that won't break your Points bank.  Keep in mind that there is a price to pay since they cannot be made ahead of time and they do not keep well.  
     This recipe (which is pretty basic) came to me some years back from a magazine in a waiting room and it has always turned out so I hope it works well for you, too.  For plain popovers just omit the lemon zest and pepper.    


Lemon Pepper Popovers (makes 6)

Ingredients:

  • 3/4 cup whole milk (I used nonfat)
  • 1/4 cup water (I used nonfat - LOL)
  • 2 large eggs
  • 1 teaspoon grated lemon zest
  • 1 tablespoon unsalted butter (I use salted)
  • 1 teaspoon butter or canola butter blend
  • 3/4 cup plus 2 tablespoons all-purpose flour
  • 1/2 teaspoon salt
  • 1/2 teaspoon freshly ground pepper (preferably)
You will need a 6-cup popover pan or a heavy muffin pan


Putting it Together:

     Preheat oven to 375 F with rack in lower third - I don't recommend using convection for this recipe and I know this from personal experience!  Divide the teaspoon of butter between the 6 cups of the popover pan, let soften and use a brush to grease the cups; set aside. 

     Whisk together the milk, water, eggs and zest in a bowl (I use a spouted bowl to make it easier to pour batter into the pan), then whisk in melted tablespoon of butter.  Add flour, salt, pepper and whisk until the batter is combined but still lumpy.

     Pour batter into buttered popover cups (I give the batter a few stirs while pouring to keep the pepper and zest from settling), dividing as equally as possible; sprinkle tops with a bit of additional pepper.  

     Bake for approximately 40 minutes or until puffed and golden; remove from oven and cut a 1/2 inch long slit in the top of each popover and bake for 5 more minutes.  Serve immediately and enjoy!  

     If you do not have a popover pan you can use a muffin pan.  This recipe for 6 popovers would make 9 smaller muffin pan popovers.  Bake about 30 minutes before cutting the slits.  

    
The total in my Recipe Builder is 20 Points for 6 popovers, 3 Points per popover.   

Gone Fishing...

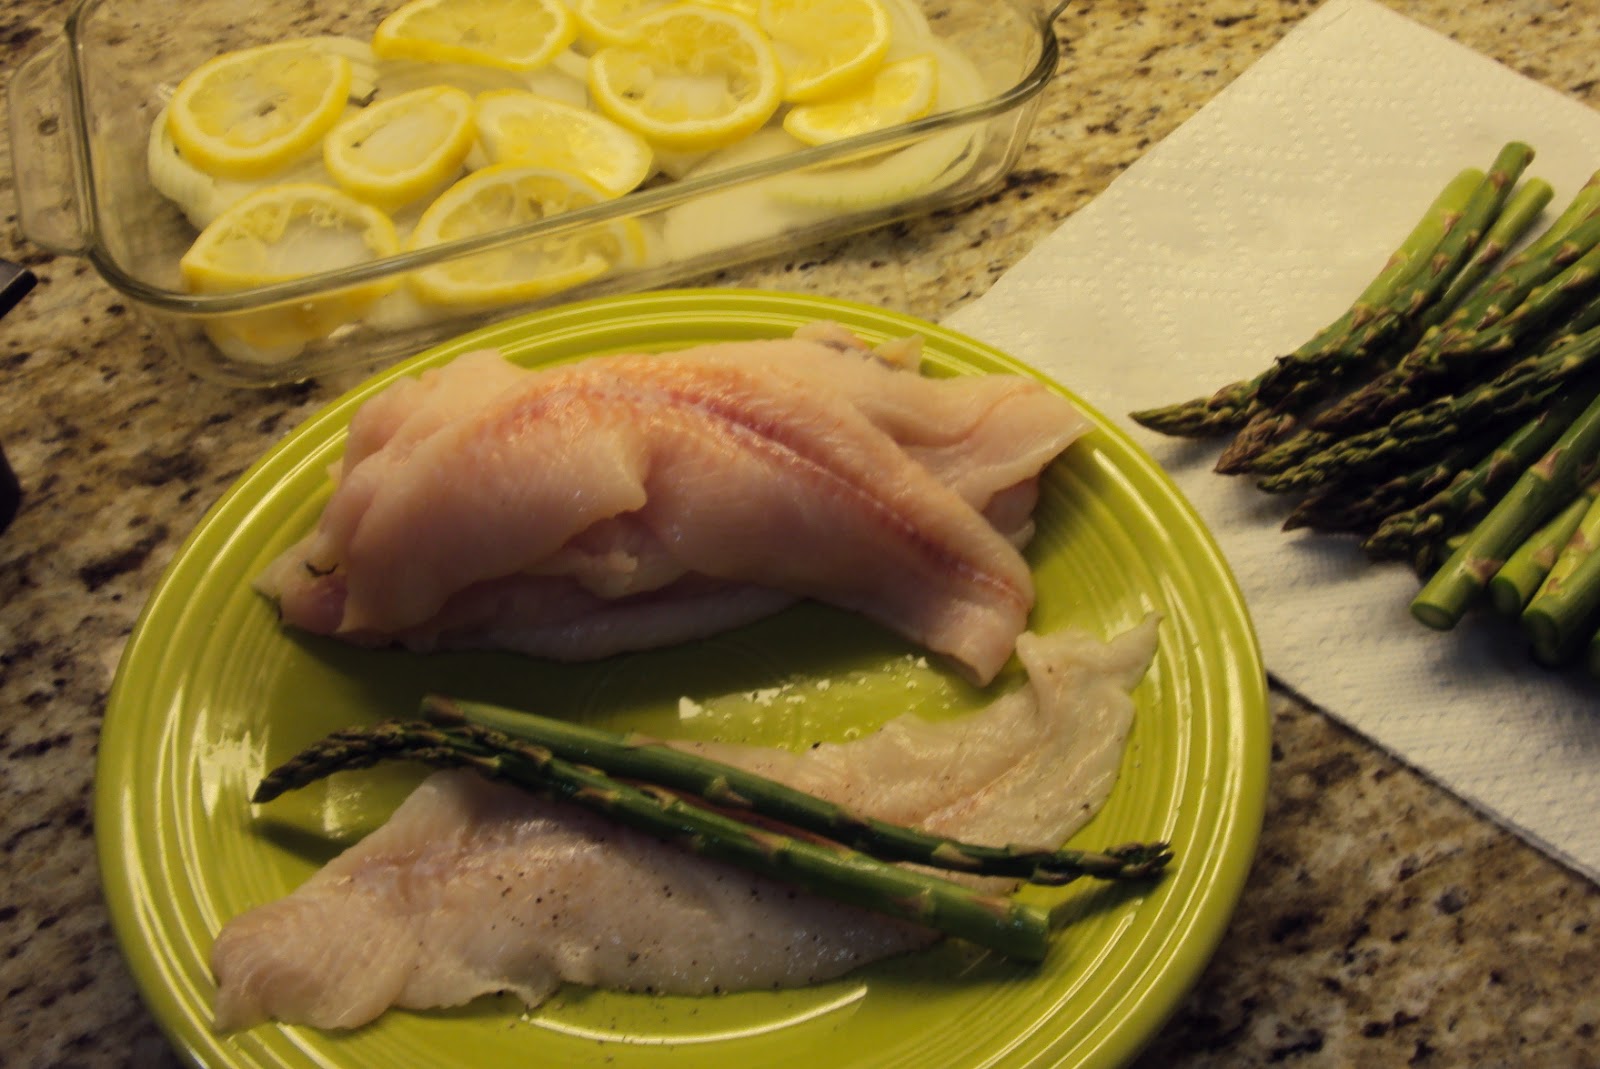
     I am thankful to have a source for good, fresh fish at Central Market here in Houston and even more thankful for their knowledgeable fish mongers.  I was deliberating waaay too long in front of the fish case (mourning the end of wild-caught salmon season) when my favorite fish guy came to the rescue - he suggested wrapping Dover sole around the asparagus he spotted in my cart.  From his mouth to my kitchen and now I've got another low Points and delicious fish dish!


 Sole-Wrapped Asparagus Bundles

  Ingredients: 

  • 1 pound of Dover sole fillets, approximately the same size 
  • A bunch of fresh asparagus (stalks on the thin side)
  • A medium onion
  • A large lemon  
  • Dijon mustard, 2 to 3 teaspoons
  • 1 tablespoon of light butter, melted
  • Salt and pepper
  • 1/4 cup water 
I used a pound of sole for two people (with hearty appetites) but that amount could serve three - this recipe is a snap to bump up or down.  

Putting it together:  

       Preheat the oven to 425 F, rack in the lower-middle.  Melt butter in a small bowl in  the microwave.  Zest lemon over same bowl - I used half for this recipe.  Lightly juice the lemon and add 2-3 tablespoons of juice to the bowl.  Whisk in the mustard and about 1/4 teaspoon salt and a few grinds of pepper.  Set aside.
     Slice the lightly juiced lemon halves and onion into thin slices and place on the bottom of the baking dish which you have sprayed lightly with cooking spray.  Pour over about 1/4 cup water and set aside.
     Rinse and trim your asparagus (if you have thick stalks you may wish to zap them for a minute or 2 in a vegetable steamer bag in the microwave beforehand).  Have the salt and pepper handy - if you mix a bit more than you need in a saucer you won't have to keep washing your fishy hands.  Lay out a fillet, season it lightly with salt and pepper, place a few asparagus across the fillet at an angle and wrap it around and under and set the bundle atop the onion/lemon/water layer in the baking dish seam side down; continue with the rest.  When you're finished, spoon the sauce over the bundles, cover tightly with foil (I use the non-stick kind) and bake for 20-25 minutes or until fish is opaque and flakes.  Use caution when checking for doneness since the bundles are steaming-baking.

My Weight Watchers Recipe Builder came up with a total of 13 Points for the entire recipe.  This would be approximately 6 ounces of cooked fish and 7 Points each if divided into 2 generous servings.  

Saturday, March 17, 2012

Eat Your Veggies, They're Good for You!


     Last year my Weight Watcher leader challenged my meeting to try a new vegetable.  I'm all for more "free" or low Point foods so the search was on but I hesitated when I came across ratatouille.  I had not been a fan of the brown mess I vaguely remembered but the pretty rainbow of veg I discovered on Smitten Kitchen was delightful!  It was called "Ratatouille's Ratatouille" after the movie (which I, too, enjoyed - certainly a sign!) so I tried out the recipe and found that I now love ratatouille!  So I made it again and again much to my husband's delight.  Happy ending, right?  Nope.  I was weary of the laborious cutting and layering but still loving the dish so I came up with a simplified version (even if it may no longer be called "true" ratatouille) that wasn't as pretty but still tasted pretty darn good and I call it Easy Ratatouille.

Easy Ratatouille


Vegetable Ingredients
  • A  Chinese eggplant (or small regular)
  • A zucchini
  • A yellow squash
  • A red, yellow or orange pepper
  • A green pepper
  • A box of baby portabella mushrooms*
  • Salt and pepper


Sauce Ingredients
  • Half an onion, finely chopped
  • 2 cloves garlic, finely minced
  • 1 teaspoon dried basil, crushed
  • 1 teaspoon dried oregano, crushed
  • 1/4 teaspoon dried thyme 
  • 1/4 teaspoon red pepper flakes
  • 14 oz. can of crushed tomatoes
  • 1/4 teaspoon ground black pepper
  • 1/2 teaspoon salt
  • Oil mister or cooking spray
  • A splash of red wine/2 tablespoons (optional) 

Putting it Together
     Spray a 2 - 3 quart oven safe casserole dish with cooking spray (I use my old French white Corning ware).  Add all the sauce ingredients, stir to combine and set aside.  Heat  oven to 400 F.    
     Clean the mushrooms, trim and slice then set aside in the frig.  They will be sauteed and added to the ratatouille at the end*.  Rinse and trim the ends off the long vegetables.  The Chinese eggplant (I prefer Chinese over regular because they usually have fewer seeds) is the softest of the veg and cooks the fastest so quarter it the long way and slice all four long wedges into 1/4+ inch slices.  Dump them into a large holding bowl.  The zucchini and yellow squash are halved down the length and cut into 1/8-1/4 inch slices; add to the holding bowl.  Wash and split the peppers, remove the seeds and membranes.  Cut them into inch-wide strips and slice the strips into 1/8-1/4 inch slices; add to the holding bowl.     
     Sprinkle the veg in the holding bowl with 1/2 teaspoon of salt and a few grinds of black pepper, toss to mix and dump the veg into your sauced casserole.  Push the veg down into the sauce but don't worry if you can't see the sauce - you will after the veg cook down a bit.  Spritz the top with an olive oil mister or cooking spray (I love my WW oil mister).  Spray a sheet of foil (or use easy release foil) with cooking spray (or use the lid if you have one), place sprayed side down and crimp to seal.  Use a small knife to make about 6 steam slits across the foil; this seems to help siphon off all that moisture the veggies release.  Place in a preheated oven for an hour.  After an hour stir the mixture (you will be able to stir the veg into the sauce now)  and return the covered dish to the oven, lower the temperature to 350F and cook for 30 - 45 minutes longer.  Cooking time depends mainly on the amount of vegetables used.
     Time to saute` the mushrooms*.  Using a teaspoon of olive oil or a spray from an olive oil mister, heat the pan to medium, add the sliced mushrooms, sprinkle with a pinch of salt and cook to your preference.  Remove pan from heat, cover to keep warm.  Check the ratatouille, if the vegetables are cooked to your liking, stir in the mushrooms and you're ready to serve.  But what will you serve it with?  Now you'll see, dear eater, why I've been making ratatouille so frequently!
     For a meatless meal I have served this recipe on fresh pasta with a sprinkling of Parmesan, just add a green salad - delicious!   For a very low carb meal or side I substitute spaghetti squash for the pasta (I don't even like squash!) and this pairing brings out the best in each.  Seriously.  I used it instead of marinara for oven-baked chicken Parmesan - yummy!  Fish, especially cod, goes so well with this ratatouille - think cod Veracruz!  After cooking the fish separately I thought, "Duh!" and laid the seasoned cod pieces directly on top of the ratatouille under the tinfoil during the last bit of cooking time.  The fish took about 10-15 minutes and it was an easy option.  With the Houston heat approaching I thought I'd be going through ratatouille withdrawal...until I remembered my slow cooker - sounds like a match made in heaven.   

A favorite pairing, baked cod and ratatouille.

A note to my fellow Weight Watchers:  I plugged the Easy Ratatouille recipe into my Recipe Builder and it totaled 11 points (the teaspoon of olive oil and 1 oz. of red wine registering the only ingredient Points and when I looked up each vegetable in the "Complete Food Companion" they were all listed as 0 Points, cooked or raw.)  So at 6 total servings that comes to 2 Points per serving; but once again I'll leave the math up to you.

Smitten Kitchen  is a wonderful cooking blog and responsible for my new-found love of ratatouille and the inspiration for my Easy Ratatouille!

Friday, March 16, 2012

Crazy for Cumin

     Cumin is one of my favorite spices and it is an important flavor in one of my seldom-made comfort foods, my mother-in-law's empanadas.  My mother-in-law lived most of her life in northwest Argentina where a regional specialty is beef-filled empanadas flavored with cumin and raisin.  The fillings used in empanadas are as varied as the many Hispanic cultures and the flavors used in my mother-in-law's recipe were influenced by Syrian and Lebanese immigrants in Argentina and are my favorite.  
     Sadly, the pastry used to make empanadas is too Points pricey these days so I came up with a burger with a similar flavor profile that has a smaller Points price with big bucks flavor.  I usually cook these on my outdoor grill but have successfully used a grill pan on my cook top, too.  In my mind these are not hamburgers so I have never served these burgers on buns but with a side of couscous since half of the onion-seasoning mixture I cook up for the burgers goes into the couscous!   


Empanada-Style Burgers with Cauli-Couscous

Seasoning Ingredients and Preparation
  • An onion (I use sweet), finely diced
  • 2 cloves of garlic, finely minced
  • 1 teaspoon olive or oil of your choice
  • 2 teaspoons light (or regular) butter
  • 2 teaspoons cumin
  • 1/2 teaspoon garam masala
  • 1 teaspoon of salt 
  • 1/2 teaspoon of freshly ground black pepper
  • 1/2 teaspoon crushed red pepper flakes
  • 1/4 cup golden raisins, roughly chopped
  • 2 tablespoons chopped parsley
Heat oil and butter in a medium saute pan.  Add onion and raisins, sprinkle on salt and crushed red and cook over medium heat until softened, about 5 minutes.  Add garlic and remaining spices, stir for an additional minute or two.  Stir in parsley, remove from heat and allow to cool.


Burger Ingredients and Preparation
  • 3/4 pound 95-96% lean ground beef
  • 1/4 pound very lean ground pork
  • Approximately half of the cooked onion-raisin mixture
  • Olive oil spray
In a large bowl, using your hands, combine meats and allotted cooked mixture.  Try not to overwork the mixture.  Form into burgers (I usually make 3 or 4), spritz with olive oil spray on each side and grill or cook.  I cook on my preheated gas grill (between 350-400 F) about 4-6 minutes on first side and 3 -5 minutes on second side (I cook these to medium to medium-well).

Cauli-Couscous Ingredients and Preparation
  • 1/2 cup couscous (I used  regular, not whole wheat, for 1 less Point per 1/4 cup)
  • 1/2 cup water
  • 1/2 medium-sized head of cauliflower
  • Approximately half of the cooked onion-raisin mixture
Rinse the cauliflower and remove any woody ends.  Using the large grate side of a box grater, grate the cauliflower (I place the grater in a large bowl to keep the bits from flying about).  The floret's grate into couscous-looking pieces, the stems end up a bit bigger.  Return the pan with the onion-raisin mixture to the heat, having pushed the already cooked mixture to the edges.  Add the grated cauliflower (1 to 2 cups) and a few tablespoons of water to the pan, cover and cook on medium low for a few minutes.  Cook the couscous according to directions (my brand says to bring 1/2 cup water to boil, stir in 1/2 cup couscous, cover and remove from heat. Let sit for 5 minutes).  Stir the cauliflower and onion-raisin mixture, taste for doneness and seasoning.  If to your liking, stir in the cooked and fluffed (just use a fork after the 5 minute wait) couscous and it's ready to serve. 
     
     I think you'll agree that the the cauliflower couscous mixture looks pretty much like, well,  couscous!  But I hope you'll discover for yourself that it has a nicer mouth feel and a sweet, nutty flavor due to the cauliflower.  The burger gets a nice caramelization and moistness from the onion-raisin addition and it reminds me of my favorite empanadas and my wonderful mother-in-law!


Empanada Burgers and Cauliflower-CousCous, inspired by my mother-in-law


Just a note to fellow Weight Watchers:  The leaness of the ground pork makes a huge point difference.  I personally love a beef-pork mix but I have also tried beef-lamb (not a lamb fan, sadly), beef-turkey, beef-veal and all beef.  For this recipe (with four servings) a burger and approximately a generous cup of cauli-couscous would cost you 8 Points, according to my Recipe Builder.

Thursday, March 15, 2012

A New Dark Leafy Green For Me...


I enjoy eating a large variety of fruits and veg.  Okay, maybe a little heavier on the fruits... With most of these fruits and veggies being zero points if eaten raw and very low points if cooked (plus low in carbs for my Type I diabetic husband), I needed to up our consumption, especially of those dark leafy greens. After watching "Ten Dollar Dinners" I got inspired by Melissa's kale salad (after all, I had already made her kale chips) so that was my jumping off point for my Kale Slaw recipe - hope you give it a try!

  
 Kale Slaw 


     Salad Ingredients
  • A bunch of kale
  • A large carrot
  • A crisp, sweet apple
  • An orange
  • 1/4 teaspoon salt


Dressing Ingredients
  • A silverware teaspoonful of Dijon mustard
  • A tablespoon of honey
  • 2 tablespoons of apple cider vinegar (I like a 1:2 ratio of sweet to sour)
  • 1 teaspoon ground cumin (adjust the spices to your liking)
  • 1/4-1/2 teaspoon garam masala
  • 1/4 teaspoon coriander
  • 1/4 teaspoon salt
  •  Few grinds of black pepper


Putting it Together

     Wash, trim and de-rib your kale (curly or leafy).  After making this salad a few times I found my favorite and the easiest way to remove those hard, tough ribs - I fold a leaf inward onto itself like a heart half and just tear up and away from the rib.  Stack the leaves on your cutting board and cut through the stack, making them into strips and place in a large bowl. 
     Zest the orange right over the leaves in the bowl (I find it easier to zest a whole fruit so I halve it after).  Now I halve the orange, juice one half and pour it over the kale.  Sprinkle over a quarter teaspoon of salt and toss so the leaves can mellow a bit while you continue with the ingredient prep. 
     Scrub the carrot, wash and trim the apple then place your box grater right in the salad bowl and shred them using the large grate.  Whisk up the dressing ingredients in a small bowl - taste it!  Adjust if necessary and pour over salad. Stir/toss to combine, cover and chill. This salad is so tangy, a bit sweet and spicy and though it has no oil, the shredded apple and carrot absorb the dressing so every bite is well-flavored. 
     Now that I've made this salad a number of times (and still love it!) I've tried a few variations:  Substituting a lemon for the orange; a firm pear when I had no apple; Swiss chard when I couldn't find kale - and they were all delicious.  Let me know what you come up with!


Just a note to my fellow Weight Watchers: I have plugged this slaw into Recipe Builder and it equaled 13 Points though the only ingredient that showed points was the honey at 2 Points for 1Tblsp.  At 6 servings that would be 2 points per serving.  The majority of fruit and veg are in their "natural" state but for the orange so I leave it up to you, dear eaters, how to value it.  My husband with Type I diabetes doesn't need to count veggie carbs so this makes for a healthy salad choice for both of us!